How to edit a BufferPrep recipe


Introduction

This section describes how to edit a BufferPrep recipe in the Method Editor.


How to edit a recipe

The table below describes how to edit a BufferPrep recipe:

Step

Action

1

Choose Edit:BufferPrep Recipes.

Result: The BufferPrep Recipes dialog box opens.

2

Select a recipe and click the Edit button.

Result: The Edit Recipe dialog box opens.

3

Change the substances and parameters as desired and click the Save button or the Save as button to save the new recipe.


Changes to recipes in methods

If a recipe has been selected and saved in a method, and the recipe is later changed, the corresponding recipe in the method will not be updated automatically. When you open the method you will be asked if you want to update the parameters in the method recipe. The recommendation is that you answer Yes.

Note: The question will not appear if you only change the Correction factors. The Correction factors in the method recipe will not be updated.


How to determine if the Correction factors need to be changed

Correction factors can be set to fine-tune a recipe around a specific pH, to obtain high pH accuracy. The table below describes how to run the BufferPrep manually at 0% and 100% in the System Control module, to determine if the Correction factors need to be changed:

Step

Action

1

Choose Manual:Other.

Result: The System Other instructions dialog box opens.

2

  • Select the recipe from the Recipe Name droplist and click the Execute button.

Result: The recipe instruction is added.

3

  • Click the Pump radio button and select BufferPrep_pH.

  • Set the pH value in the pH parameter box and click the Execute button.

Result: The BufferPrep pH value is added and the run starts.

4

  • Select Flow.

  • Set the flow rate in the FlowRate parameter box and click Execute.

Result: The new flow rate is added.

5

Check the pH reading when it is stable in the BuffPre_pH meter in the Run Data pane.

Note: At least 30 ml of eluent must pass through before the reading stabilizes.

To display the BuffPre_pH meter, right-click and select Properties. Select BuffPre_pH on the Run Data Groups panel and click the OK button.

6

  • Select Gradient in the Instructions list.

  • Type 100% in the Target parameter box, 0 in the Length parameter box and click Execute.

Result: The gradient instruction is added.

7

Check the pH reading when it is stable at 100%.

See “How to change the Correction factors” below.


How to change the Correction factors

If the readings described in the instruction above are acceptable at both 0% and 100%, the Correction factors do not need to be changed. If the Correction factors do not produce an acceptable result, they must be adjusted in the Method Editor module. The table below describes how to change the Correction factors:

Step

Action

1

Choose Edit:BufferPrep Recipes.

Result: The BufferPrep Recipes dialog box opens.

2

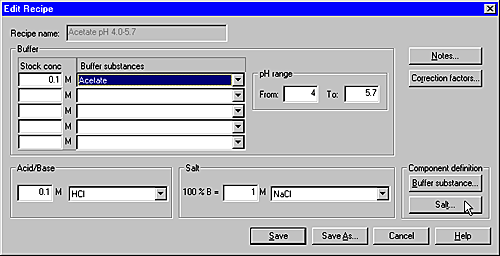
Select the recipe from the Recipe droplist and click the Edit button.

Result: The Edit Recipe dialog box opens.

3

Click the Correction factors button.

Result: The Correction Factors dialog box opens.

4

  • Type the deviation at 0% and 100%.

Example: If the pH is set to 7.0 and the actual pH is 7.1, the Correction factor is 0.1. If the actual pH is 6.9, the Correction factor is -0.1.

  • Click OK.

  • Click the Save button or the Save as button to save the recipe.

Note: If there already are Correction factors, the measured pH deviation should be added to the old factors.


2005-06-15