

|
|
|
|
|
How to import and compare curves
|
|
|
Introduction

|
This section describes how to import or copy curves from different
runs into one chromatogram for comparison.
|
|
|
|
|
Commands to use
|
Two
commands can be used to import curves from result files into one chromatogram:
-
File:Open to compare
This is the preferred option if you want to automatically
search result files that are stored in the same folder to locate
all curves of a specified type, for example, all UV curves. This
is especially useful for comparison of curves from scouting runs.
Moreover, the imported curves can be automatically overlaid, stacked
or presented as mirror images. See "How to use File:Open to compare"
below.
-
File:Open:Curves
This is the preferred option to import individual curves.
See " How to use File:Open:Curves" below.
Note: Original curves
are underlined in the chromatogram, imported and created curves
are not underlined.
|
|
|
|
|
How to use File:Open to compare
|
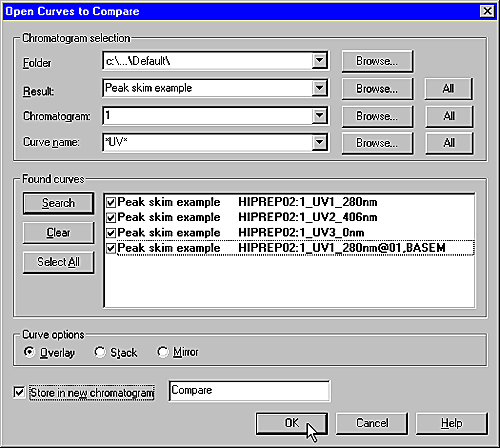
The
table below describes how to import curves to a chromatogram with
the command File:Open to compare:
|
Step
|
Action
|
|
1
|
In the Evaluation module,
or
Result: The Open Curves to Compare dialog
box opens.
|
|
2
|
-
Select the
desired search criteria in the Folder, Result, Chromatogram and Curve
name droplists of the Chromatogram selection section.
-
Click Search and
a list of found curves will be displayed based on the selected search
criteria.
Note: A new search
can be performed with new search criteria without erasing curves
located in the previous search.
-
Select the check
boxes for the curves that you want to import. Click the Select All button if you want
to import all the curves.
-
If you select the Store
in new chromatogram option, the curves will be imported
into a new chromatogram. This is recommended to keep the source
chromatogram free of too many additional curves.
|
|
3
|
Select how to display the imported curves in the Curve options field and click OK. See the options below:
Overlay

The curves are presented overlaid on one another.
Stack
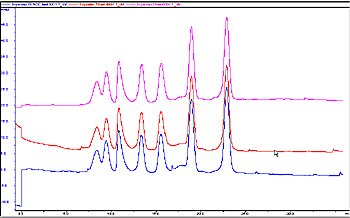
The curves are presented with a given offset Y-axis value
so that the curves are stacked and distinct from one another.
Mirror
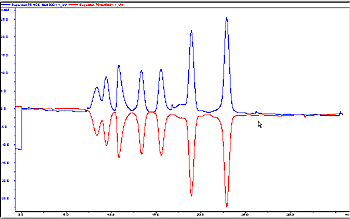
For comparison of two imported
curves. One curve is inverted in the Y-axis and thus appears to
mirror the other curve.
|
|
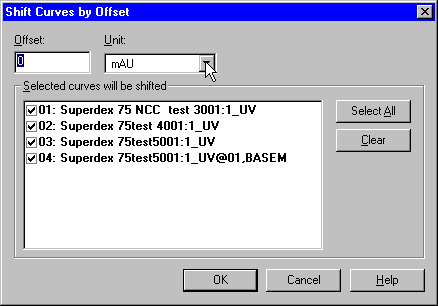
4
|
If you selected the Stack option
in step 3, the Shift Curves by Offset dialog
box is displayed:
Result: Depending
on your previous choices, the imported curves are now displayed
in the source chromatogram or in a newly created chromatogram.
Note: If curves
with several different units have been selected, the curves with
each different unit will be grouped together with separate offset
from the other groups.
|
|
5
|
Change some comparison settings
-
Choose Edit:Chromatogram Layout to open
the Chromatogram Layout dialog
box.
-
Select or de-select the check boxes on the Curve tab to compare a different
set of curves.
-
On the Y-Axis tab,
the curves can be scaled
individually
all with the same scale (click the All with this unit button).
-
Click OK to
display the curves.
|
|
6
|
If you stacked the curves and want to change the stack
offset
Note: The individual
curves can also be moved (see How
to stack and stretch curves).
|
|
|
|
|
|
How to use File:Open:Curves
|
The
table below describes how to import individual curves into an active chromatogram
with the File:Open:Curves command:
|
Step
|
Action
|
|
1
|
Make sure that the destination chromatogram for the
imported curve(s) is active on the screen.
|
|
2
|
Select curves in the Open curves dialog
box
Result: The available
curves are listed on the Available list.
Result: The selected
curve(s) is displayed in the Selected
curves list. To remove a curve from the Selected curves list, click the check
box and then click the Remove button.
|
|
3
|
|
|
4
|
Change some comparison settings
-
Choose Edit:Chromatogram Layout to open
the Chromatogram Layout dialog
box.
-
Select or de-select the check boxes on the Curve tab to compare a different
set of curves.
-
On the Y-Axis tab,
the curves can be scaled
individually
all with the same scale (click the All with this unit button).
-
Click OK to
display the curves.
|
|
|
|
|
|
How to copy curves into one chromatogram
|
A
practical way to compare curves is to create a chromatogram and
copy curves from different chromatograms into the new chromatogram.
The comparisons are then performed in the new chromatogram.
The table below describes how to copy curves into a chromatogram:
|
Step
|
Action
|
|
1
|
Perform either A
or B below:
A. Create a new chromatogram
B. Use the Temporary chromatogram
|
|
2
|
Open the source chromatogram(s)
Choose File:Open:Chromatogram to
open the chromatogram(s) that contains the curves you want to copy.
Result: The Open Chromatogram dialog box opens.
|
|
3
|
Result: The source
chromatogram opens.
|
|
4
|
Copy the curves
Result: The Copy Curve dialog box is displayed.
|
|
5
|
-
Select the
source chromatogram and a curve of interest in the Source Chromatogram field.
-
Select the target chromatogram (the one you created,
or Temporary) in the Target Chromatogram field.
-
Click the Copy button.
-
Repeat this step for as many curves as you want,
from the same or other chromatograms.
Note: You can open
more source chromatograms with the File:Open:Chromatogram command.
-
Click the Close button
when you have copied all curves.
|
|
6
|
Change some comparison settings
-
Make sure the target
chromatogram is open and that its window is active.
-
Choose Edit:Chromatogram
Layout to display the Chromatogram
Layout dialog box.
-
Select the curves that you want to view on the Curve tab and click OK.
-
The curves can be scaled individually or all with
the same Y-axis scale. Use the All
with this unit button on the Y-Axis tab
to scale all curves with the same scale.
|
|
7
|
If you used the Temporary chromatogram
-
If you used the Temporary chromatogram you can
perform evaluations in the Temporary chromatogram
and transfer the final curves to other destination chromatograms.
-
All of the contents in the Temporary chromatogram
can be removed with Edit:Clear Temporary
Chromatogram.
|
Alternative way to copy curves
An alternative way to copy curves into one chromatogram is
to
|
|
|
|
2005-06-15
|
|
|