

|
|
How to use Text instructions
|
|
|
Introduction

|
You can use the Text Instructions editor
in the Method Editor to
build your method step by step. You can also use the editor to modify
instructions in methods created by wizards or based on templates.
Advanced editing facilities are available when you work directly
in the Text Instructions editor.
This section is a very brief description of this process. See How
to edit methods for detailed instructions.
Note: Each method
is written for a specific strategy. The function of the method cannot
be guaranteed on systems having other strategies.
|
|
|
|
|
When do I use Text Instructions?
|
Use Text Instructions when you want:
-
to change selected
instructions in the method, for example the outlet valve position
-
to add blocks or instructions, for example Watch instructions
-
to change method instructions to adapt to non-standard
system configurations
-
to create new methods for applications not covered
by the supplied templates or wizards.
|
|
|
|
|
How to edit Text Instructions
|
Open the Text Instructions editor by following
the steps in the table below.
|
Step
|
Action
|
|
1
|
Select the Method Editor module
and click the Text Instructions icon.

|
|
2
|

|
|
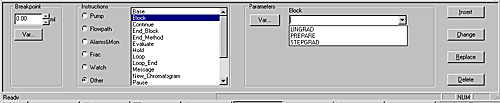
3
|
Select instructions in the Instruction
box in the lower part of the Method
Editor, and use the Insert, Change, Replace or Delete buttons. All text entries
are shown in the Text pane.
Applicable variables can be edited for each selection.
The illustration below shows the Instruction
box:
|
|
|
|
|
|
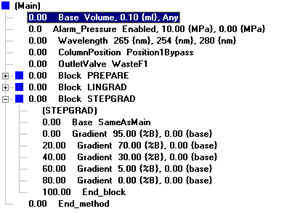
Instructions can be organized in blocks
|
Individual text instructions can be grouped in blocks of instructions
(marked by blue square symbols) for a specific functional use, e.g.
to load a sample, to equilibrate a column etc. A block may contain
other blocks or individual instructions.
This is an example of text instructions in the Text pane:
|
|
|
|
|
How to save the new method
|
A new method is untitled,
and must be saved under a method name before it can be used.
The table below describes how to save a new method.
|
Step
|
Action
|
|
1
|
Click the Save Method toolbar
or choose File:Save.
|
|
2
|
-
If required,
save the method in a folder other than the default home folder.
-
Enter a Method name for
the method. The total path can be up to 256 characters long. The
method name must be unique for the chosen system within the folder.
|
|
3
|
Result: The method
is saved, but remains open in the Method
Editor, so that you can continue editing if you wish.
|
Note: You might
want to sign your method. If you do so, you can choose to lock the method
so that nobody will be able to change the method. See How to sign
the method for further instructions.
|
|
|
|
|
How to display descriptions of instructions
|
A
dedicated strategy is available for each system in the ÄKTAdesign platform. Although
the majority of the instructions are general, some of them differ
slightly between the individual strategies.
The list below describes two ways to display descriptions
of the instructions in your particular strategy:
or
|
|
|
|
|
How to print descriptions of instructions
|
The table below describes how to print descriptions of the
instructions in your particular strategy:
|
Step
|
Action
|
|
1
|
Select File:Print in
the Method Editor.
|
|
2
|
|
|
|
|
|
|
How to add a Snapshot
|
The Snapshot instruction can be used
to record the curve values at a specific point in the method run. For
example, a snapshot can be inserted to record the curve values immediately
before an injection. The values are recorded in
the result file and can be viewed in the Snapshots tab
of the Documentation dialog
box (See Run documentation).
Up to 500 snapshots can be recorded in each result file. The table below
describes how to add a snapshot instruction to a method:
|
Step
|
Action
|
|
1
|
|
|
2
|
|
|
3
|
Type a name in the Name text
box in the Parameters field.
|
Note: Snapshots
can also be taken in the System Control and Evaluation modules. However, these
snapshots will only record the data for a specific moment. For more
information about the Snapshot function
see Snapshots.
|
|
|
|
2005-06-15
|
|
|