How to install CU-950


When to use CU-950

The CU-950 controller is an interface to connect chromatography or synthesis instruments to a PC. CU-950 can be used together with all the ÄKTA instruments except ÄKTAprime, ÄKTAxpress and ÄKTAprocess. ÄKTAprocess instruments are delivered with another controller which is similar to the CU-950 but also includes a Profibus interface. See How to install CU-960 for more information.

Note: The instruments that can be used with CU-950 can also be used with the CU-900 PCI expansion card. See How to install CU-900 PCI for information on how to install CU-900 PCI.

The LEDs on CU-950

There are three LEDs on the front of the CU-950 which can be in three different states:

  • Off (no light)

  • Flashing

  • On (steady light)

The table below describes what the state of each LED means.

LED

Off

Flashing

On

Power

Power off

Power on, BIT running or BIT not OK

Power on, BIT OK

PC

Power off

Power on, no PC communication

Contact with PC established

System

Power off

Power on, no system (ÄKTA instrument) communication

Contact with system (ÄKTA instrument) established

BIT = Built-in test

Note: The system LED will flash while the system is scanning to identify all components. At the same time the run data instruments in the System Control module will read Scanning. When the scanning process is completed, the system LED will stop flashing and the instruments will read Ready. If any instrument component causes an error or is missing, this will be indicated in the UNICORN System Control module during the test.

CU-950 USB and CU-950 Advanced

There are two versions of the CU-950 controller, USB and Advanced. The table below describes how they connect and how many that can be connected to the PC.

Controller

Connector

Max. units connected

CU-950 USB

USB (Universal Serial Bus)

1

CU-950 Advanced

Ethernet

4

In order to use the CU-950 USB, certain drivers need to be installed. See instructions below.


How to install the USB drivers

The table below describes how to install the CU-950 USB drivers.

Note: This installation is only necessary if you use the CU-950 USB.

Step

Action

1

  • Start and log on to the PC.

  • Connect the CU-950 power cable to the mains socket and wait until the LEDs show that it has started up:

    Power LED: On (steady light)

    PC LED: Flashing

    System LED: Flashing

  • Connect the USB cable to the CU-950 and the PC.

2

Since this is the first time you connect the CU-950, the Found New Hardware Wizard is started.

  • Select the option Install the software automatically.

  • Click the Next button.

3

  • Select Search for the best driver in these locations.

  • Select only Include this location in the search.

  • Insert the UNICORN CD into the CD-ROM drive of the PC.

  • Click the Browse button and locate the folder \\Drivers\Cu950 Cu960.

  • Click the Next button.

    Result: The necessary files are copied to the hard disk.

Note: In Windows XP, a warning may be displayed saying that the drivers are not signed. Choose the option to install anyway.

4

The Completing the Found New Hardware Wizard screen is displayed.

  • Click the Finish button to complete the installation.

Note: CU-950 uses the same drives as CU-960.

CU-950 system installation

To be able to control a system (an instrument) with the CU-950 controller the UNICORN software has to be set up accordingly. Usually this is done when the UNICORN software is installed for the first time, but it can also be done afterwards.

System installation during UNICORN software installation

The system installation part of the UNICORN software installation is described in Step 11 - System Installation.

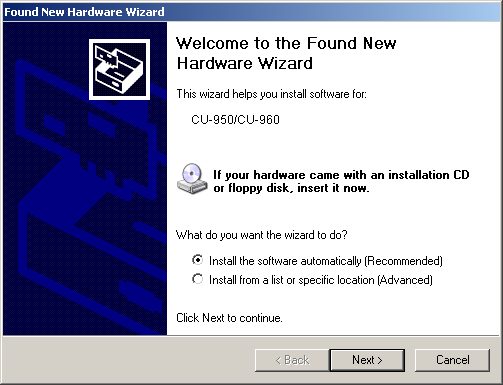
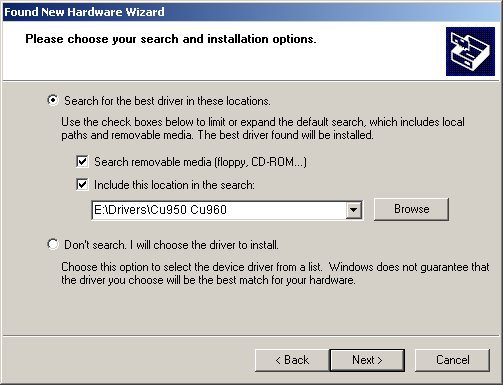
System installation after UNICORN software installation

The table below describes how to perform a CU-950 system installation after the UNICORN software has been installed.

Step

Action

1

  • Insert the UNICORN CD in the CD-ROM drive.

Result: The Setup wizard starts and displays the Welcome screen.

  • Click the Next button.

2

The Select Components screen is displayed.

  • Make sure that the System Installation option is selected. You should deselect the other check boxes unless you want to install other components.

  • Click the Next button.

3

The Program Options screen is displayed.

  • Specify the number of System Control Windows you want to be available, normally the number of instruments that will be simultaneously connected to the PC.

    Maximum value is

    1 for CU-950 USB

    4 for CU-950 Advanced.

  • Click the Next button.

4

The Start Copying Files screen is displayed.

  • Click the Next button.

5

The System installation screen is displayed.


CU-950 Advanced port numbers

The TCP ports used by UNICORN for the CU-950 Advanced are numbered 60X01-60X33, where X is the CU ID minus 1.

Example

  • The CU ID = 1 (default)

  • => X = 1 - 1 = 0

=> The TCP port numbers used on the PC and on the CU = 60001-60033


2005-06-15