

|
|
How to install UNICORN for ÄKTAxpress
|
|
|
Before you start

|
Before
you start the installation procedure the following prerequisite
has to be met:
Also notice the following:
-
You can exit the
installation at any point by clicking on either the Cancel button or the Exit button. If you do this, however,
the installation will be incomplete and the software cannot be used.
-
After the installation, the installed files are
compared with the original files on the installation CD to make
sure that no files have been corrupted during installation. The
criteria used for the file comparison are name, size, version and
checksum.
|
|
|
|
|
Upgrading a UNICORN installation
|
Installing a new version of the UNICORN software over an existing
UNICORN installation is no problem. You do not have to uninstall
the previous version before installing the new version.
|
Note:
|
If you have made additions to the previous installation you
will be asked if you want to keep these additions when UNICORN is
started the first time after the new installation. This is described
in Step
4 - Select Components.
|
|
|
|
|
|
Do not copy the CD-ROM or decompress the files
|
UNICORN is supplied on a CD-ROM. Files on the CD-ROM are compressed and
cannot simply be copied onto the hard disk. During the installation
procedure, the required folder structure is created on the hard
disk and the files are decompressed. Do not attempt
to decompress the files using any other file decompression utility.
|
|
|
|
|
Step 1 - Insert the Setup CD
|
Follow
the instructions in the table below to begin the installation:
|
Step
|
Action
|
|
1
|
The UNICORN Setup Program should start automatically. If not,
-
click the Windows Start button and select Run
-
type the command d:setup,
where d: is the unit
for your CD-ROM drive.
-
click OK.
|
|
2
|
The UNICORN Setup program is launched. Continue the
setup below.
|
|
|
|
|
|
Step 2 - License agreement and user information
|
The table below describes how to complete step 2 of the UNICORN
Setup program.
|
|
|
|
|
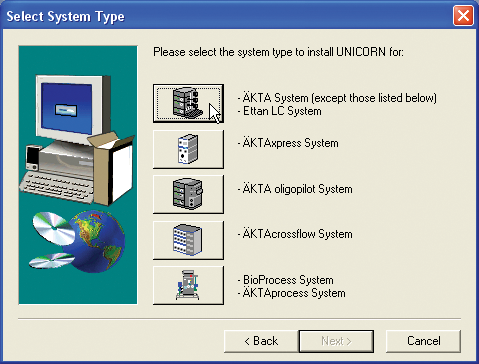
Step 3 - Select System Type
|
In the Select System Type dialog
box you choose the type of system you will use, an ÄKTAxpress system
or a UNICORN system other than ÄKTAxpress.
|
|
|
|
|
Step 4 - Select Components
|
In the Select Components dialog
box you choose the components to install by selecting the appropriate
check boxes. Normally, all the check boxes should be selected.
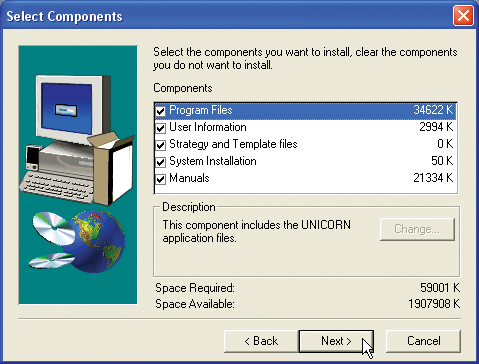
Select the components to install according to the table below.
|
Component
|
Description
|
|
Program Files
|
The Program Files check
box must be selected.
|
|
User Information
|
The User Information check
box must be selected if
you are installing UNICORN for the first time on the computer.
The Select Sub-components dialog box
Select User Information check
box and click the Change button.
Result: The Select Sub-components dialog box is
displayed, showing the sub-components:
Select the components you wish to install.
If sub-components already exist
If any of the above components already exist from a previous
installation, you will be asked if you want to replace them with
the new default files.
|
Note:
|
See also User Information where
this dialog box is described in more detail.
|
|
|
Strategy and Template files
|
-
Select the Strategy and Template files check box
to install strategies and templates.
-
Click the Change button
to display the Select Sub-components dialog
box. There you can select which components to install, Strategy files and/or Template files.
|
|
System installation
|
The System check
box must be selected for workstations where systems are connected,
but not on demo stations.
|
|
Manuals
|
|
|
Note:
|
A 3rd Party Software license information box will be displayed
before the next step. Click the Next button
again to proceed.
|
|
|
|
|
|
Step 5 - Select Drive
|
In the Select Drive dialog
box you choose the installation folder for the UNICORN software.
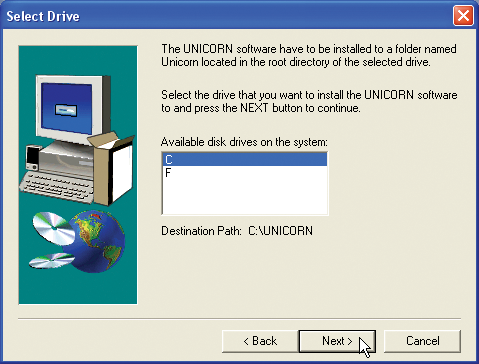
Follow the instructions in the table to select a disk drive:
|
Step
|
Action
|
|
1
|
Select the disk drive where the program is to be installed.
This should be a physical disk drive (usually C:) on the computer where you
install UNICORN, not a network disk drive.
|
|
2
|
|
|
|
|
|
|
Step 6 - Setup Type
|
The Setup Type dialog
box is displayed:
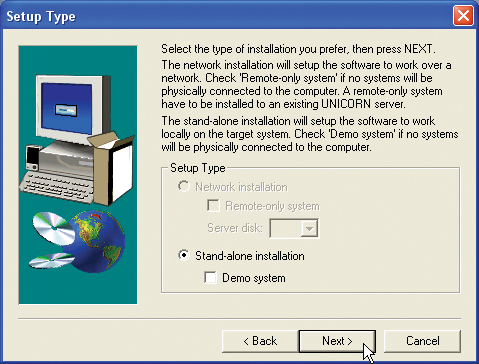
The table below describes the choices in the Setup Type dialog box.
|
Step
|
Action
|
|
1
|
Select either of the options
|
|
1 a
|
Network installation
A network installation can be either
-
a local station
-
a remote-only system.
You have to select these disk drives in a network installation:
Select the Remote-only system check
box to install a remote-only system, a computer to which no systems
are physically connected.
|
Note:
|
When you perform a network installation, the necessary UNICORN
software components will be copied automatically to the network
server disk.
|
|
|
1 b
|
Stand-alone installation
A stand-alone installation can be either
-
a local station
-
a demo station.
Select the Demo system check
box if you want to install a demo station.
The network options settings are ignored for a stand-alone
installation.
|
Note:
|
If you perform a stand-alone installation and later want to connect
the system to a network, you must remove the current installation
and install the software with the appropriate settings.
|
|
|
2
|
|
|
|
|
|
|
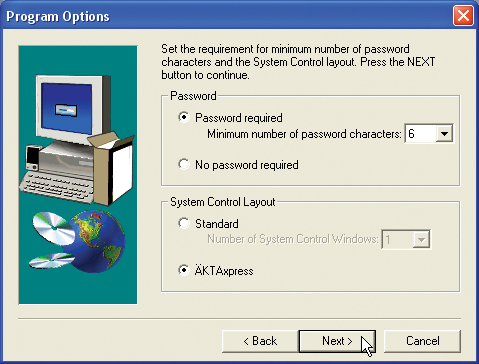
Step 7 - Program Options
|
Follow the instructions in the table below to set the required
parameters for password and system control layout:
|
Step
|
Action
|
|
1
|
Select Password required and
type the minimum number of characters required for passwords. Valid
numbers of password characters are 3 -15.
Select No password required if
you do not require password protection. With this setting, users
can be defined with or without passwords.
|
|
2
|
Choose either of the System
Control Layout options.
-
Standard
The standard layout for the System Control module. Must be chosen
if Scouting or Method Queues are going to be used.
Select the
number of system control windows, 1-4.
-
ÄKTAxpress
The new layout for the System Control module. It has only
one System Control window which can connect to all the systems installed.
Quick-switching is possible with the new system navigator.
|
|
3
|
Click the Next button
to continue.
|
|
|
|
|
|
Step 8 - Select Program Folder
|
In the Select Program Folder dialog
box you choose where to store the program icon.
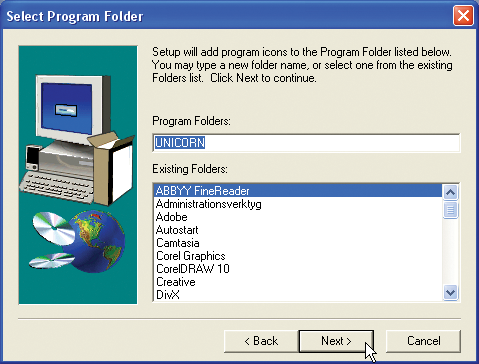
The table below describes how to select a program folder for
the UNICORN icon:
|
Step
|
Action
|
|
1
|
In the Select Program
Folder dialog box, you select the Start menu folder where
you want the UNICORN icon to be placed.
You can either
-
accept the suggested
folder named "UNICORN" (recommended)
or
-
create a new folder. Type the name of the new folder
in the text field Program Folders.
or
-
select a folder that already exists by clicking
its name on the list.
|
|
2
|
Click the Next button
to continue.
|
|
|
|
|
|
Step 9- Start Copying Files
|
The Start Copying Files dialog
box displays the installation choices made.
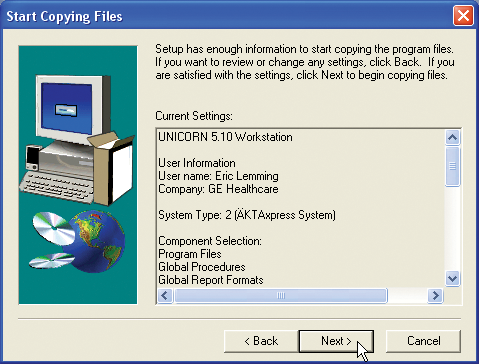
The table describes how to start copying the program files
from the CD:
|
Step
|
Action
|
|
1
|
The setup program is ready to copy the files. The Start Copying Files dialog box
displays all the selections that have been made and the components
to be installed.
|
Note:
|
If you want to make any changes you can click the Back button one or more times.
|
|
|
2
|
If the settings are correct, click the Next button to copy the files.
|
|
|
|
|
|
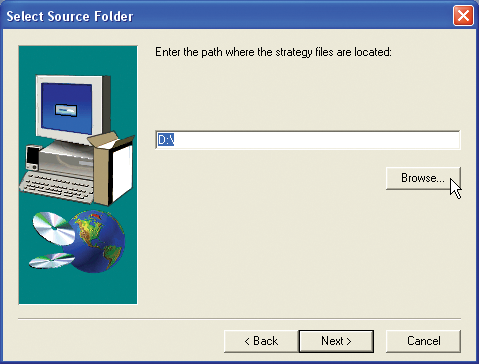
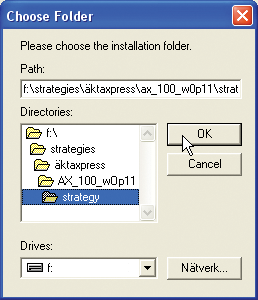
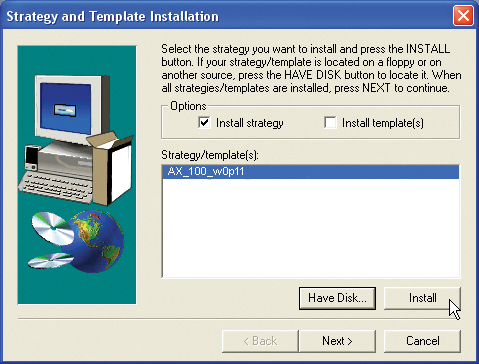
Step 10 - Strategy and Template Installation
|
The Strategy and Template Installation dialog
box is displayed if you chose to install strategy and/or template
files in step 4.
If you did not choose
to install strategy and template files, go to "Step 11 - System
Installation" below.
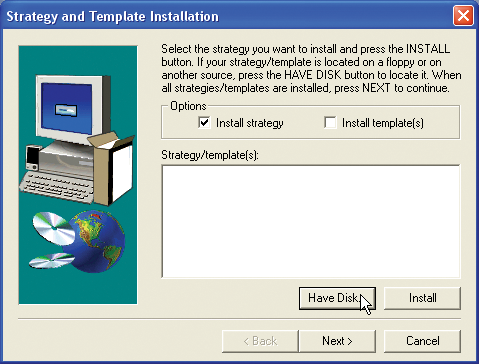
Follow the instructions in the table below to install strategy
and template files:
|
Step
|
Action
|
|
1
|
|
Note:
|
If the options for both strategy and template are checked,
the template files are automatically installed together with the strategy.
|
Result: The Select Source Folder dialog box
opens.
|
|
2
|
Result: The Choose Folder dialog box opens.
|
|
3
|
Result: The dialog
box closes and the selected strategy or template is added to the Strategy and Template Installation dialog box.
|
|
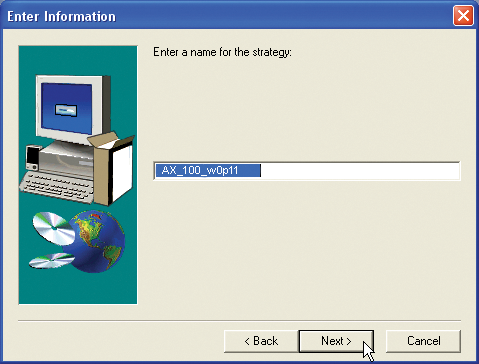
4
|
Result: The Enter Information dialog box is
displayed.
|
|
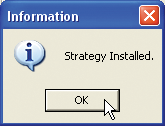
5
|
Result: The strategy
or template is installed and an Information dialog
box is displayed as a confirmation.
|
|
6
|
Result: The Strategy and Template Installation dialog
box is displayed again.
|
|
7
|
|
|
|
|
|
|
Step 11 - System Installation
|
The System Installation dialog
box is displayed if you chose system installation in Step
4 - Select Components.
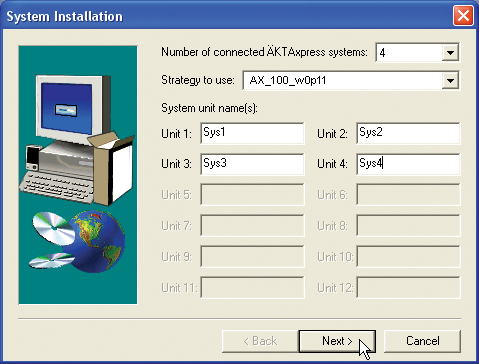
The table below describes how to define ÄKTAxpress systems.
|
Step
|
Action
|
|
1
|
Specify the Number of
connected ÄKTAxpress systems, 1-12. This is the maximum
number of systems that you plan to connect simultaneously to the
computer.
|
Note:
|
The number you choose here determines how many systems you
can name in step 3 in this table.
|
|
|
2
|
Choose the Strategy to
use for the systems.
|
Note:
|
The strategy you choose will apply to all systems, you cannot define
different strategies for different systems. To change strategies
after the UNICORN installation, choose Administration:System
Setup in the UNICORN Manager.
|
|
|
3
|
Type the names for the systems in the Unit 1-12 edit fields.
|
|
4
|
Click the Next button.
|
|
Note:
|
If you want to define systems later or change the settings
for a previously defined system, run the Setup program once again
with only the System Installation option
selected in the Component Selection dialog
box.
|
|
|
|
|
|
Step 12 - Setup Complete
|
The installation is complete and the computer must be restarted:
|
|
|
|
2005-06-15
|
|
|