

|
|
|
|
|
How to configure Windows XP workstations
|
|
|
Introduction

|
This subsection describes how to configure Windows XP workstations
in a UNICORN network with a Windows server and TCP/IP network protocol.
|
|
|
|
|
User rights
|
All users must have the Windows user right Access this computer from the network,
which is also the default user right. If the user right is not correct the
network administrator can change it.
|
|
|
|
|
How to set the correct user right
|
Follow
the instructions in the table below to set the user right to Access this computer from the network.
|
Step
|
Action
|
|
1
|
Log on to the workstation with administrative rights.
|
|
2
|
Choose Start:Control Panel:Administrative
Tools:Local Security Policy.
|
Note:
|
If you cannot see the individual items in the Control Panel you
have to click the link Switch to Classic
View in the left pane of the Control Panel.
|
|
|
3
|
Choose Security Settings:Local
Policies:User Rights Assignment in the tree structure.
|
|
4
|
Double-click the Access
this computer from the network option.
|
|
5
|
Click the Add User or
Group button.
Result: The Select Users or Groups dialog
box is opened.
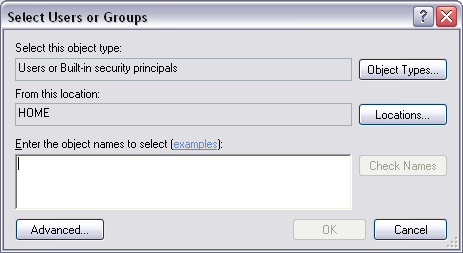
Make sure the correct domain is displayed in the text field From this location.
Click the button
|
|
6
|
Choose one of the following options:
Option 1: Write the name
-
Write the name of the group
or user(s) in the text field Enter the
object names to select (examples).
-
Click the Check Names button
to check if the name is valid.
-
If the name is accepted, click OK and
then OK again.
Option 2: Choose the name from a list
-
Click the Advanced... button. An expanded Select Users or Groups dialog
box is opened.
-
Click the Find Now button
to display a list of possible names.
-
Select one or more names and click OK.
-
Click OK and
then OK again.
|
|
|
|
|
|
Network components to install
|
In
order to connect a Windows XP workstation to the network, the following network
components need to be installed on the workstation:
|
|
|
|
|
How to install network components
|
Follow
the instructions below to install the necessary network components.
|
Step
|
Action
|
|
1
|
|
|
2
|
Choose Start:Control Panel:Network
Connections.
Result: The Network Connections window is
opened.
|
|
3
|
Right-click the Local
Area Connection icon and choose Properties.
Result: The Local Area Connection Properties dialog
box is opened and the General tab
is displayed.
|
|
4
|
If the component Client
for Microsoft Networks is already installed, go to step
5.
Otherwise,
-
Click the Install button, select the component Client from the list and click
the Add... button.
-
Select Client for Microsoft
Networks from the list and click OK.
|
|
5
|
If the component File
and Printer Sharing for Microsoft Networks is already
installed, go to step 6.
Otherwise,
-
Click the Install button, select the component Service from the list and click
the Add... button.
-
Select File and Printer
Sharing for Microsoft Networks from the list and click OK.
|
|
6
|
If the component Internet
Protocol (TCP/IP) is already installed, go to step 7.
Otherwise,
-
Click the Install button, select the component Protocol from the list and click
the Add... button.
-
Select Internet Protocol
(TCP/IP) from the list and click OK.
|
|
7
|
-
In the Local Area Connection Properties dialog
box, select Internet Protocol (TCP/IP) and
click Properties.
-
Configure the TCP/IP protocol with network-specific
information.
|
|
|
|
|
|
How to connect the workstation to the domain
|
Follow
the instructions in the table below to add the workstation to the
Windows domain.
|
Step
|
Action
|
|
1
|
Log on to the Windows XP workstation with administrator
rights.
|
|
2
|
Choose Start:Control Panel:System.
Result: The System
Properties dialog is displayed.
|
|
3
|
Choose the Computer Name tab
and click the Change... button.
Result: The Computer Change Names dialog is
opened.
|
|
4
|
|
|
5
|
|
|
6
|
A dialog is displayed which informs that the computer
should be restarted for the changes to take effect.
Click OK in the dialog
and restart the computer.
|
|
|
|
|
|
To map a drive letter and install UNICORN
|
The last steps in the network setup are
See the instructions below.
|
|
|
|
|
How to map the shared folder
|
Follow
the instructions in the table below to map the shared folder to
a suitable drive letter.
|
Step
|
Action
|
|
1
|
Log on to the Windows XP workstation with domain user
rights. This user must also be a member of the user group created
before.
|
|
2
|
Open Windows Explorer.
|
|
3
|
Select Tools:Map Network
Drive to connect the shared folder on the UNICORN file
server to the designated drive letter:
|
|
4
|
|
|
5
|
|
|
|
|
|
|
How to install UNICORN on a workstation
|
Follow
the instructions in the table below to install UNICORN.
|
Step
|
Action
|
|
1
|
Install UNICORN. See How to install
UNICORN (select the Network
installation option) or How
to install UNICORN for ÄKTAxpress.
|
|
2
|
Reboot the PC and log on as one of the domain users
that will run UNICORN.
|
|
3
|
Connect the shared folder again. This is necessary
since connected network drives are user-specific.
|
|
4
|
Open Windows Explorer.
|
|
5
|
Select Tools:Map Network
Drive to connect the shared folder on the UNICORN file
server to the designated drive letter:
|
|
6
|
|
|
7
|
|
|
8
|
Start UNICORN and set up
|
|
|
|
|
2005-06-15
|
|
|