

|
|
|
|
|
System definitions
|
|
|
General guidelines

|
-
System definitions
are used to set up the systems in a UNICORN installation. The definitions
must be made for each new system that is installed.
-
In a network installation, the definitions must
be performed for each local computer in the network.
|
Note:
|
Access rights to a system are controlled at the user administration
level, see User
administration.
|
|
|
|
|
|
Important!
|
The UNICORN
computer name
-
The computer name
in the UNICORN software must be
the same as the Windows computer name. The Windows computer name
is therefore automatically filled in as the UNICORN computer name
when you create a new system definition.
-
Subsequently, if the Windows computer name for some
reason is changed after the UNICORN installation, you manually have
to change the computer name in UNICORN.
How to change the computer name
The table below describes how to determine the Windows computer
name and change the UNICORN computer name accordingly:
|
Step
|
Action
|
|
1
|
-
Open Windows Control Panel and double-click
the System icon.
-
Look for an item called Computer
Name.
|
Note:
|
Depending on your Windows version, you might have to click
a tab to find the computer name.
|
-
Take a note of the computer name and click the Cancel button.
|
|
2
|
Start UNICORN and choose Administration:System
Setup in the UNICORN Manager.
Result: The System Setup dialog box is displayed.
|
|
3
|
-
Select the
system and click the Edit button.
-
Check that Computer
name is the same as the Windows computer name. If not,
change the UNICORN computer name.
|
|
4
|
Click OK and
then the Close button.
|
|
|
|
|
|
Possible actions in the System Setup dialog box
|
Systems
are edited in the System Setup dialog
box in the UNICORN Manager.
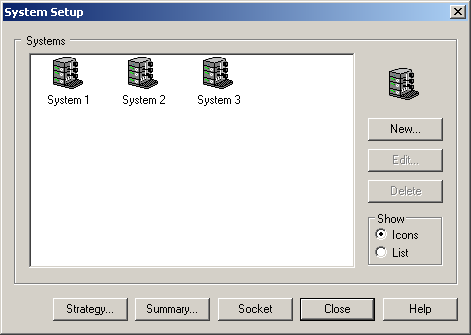
Possible actions
The table below describes the actions you can perform in the System Setup dialog box. Each
action is described further on in this section.
|
Note:
|
You need the UNICORN installation CD to perform the actions New and Delete.
|
|
If you want to...
|
then click the button
|
|
create a new system definition
|
New
|
|
edit a system definition
|
Edit
|
|
delete a system definition
|
Delete
|
|
delete a strategy
|
Strategy
|
|
view or print a system summary
|
Summary
|
|
use socket communication
|
Socket
|
|
view installed systems as icons
|
Icons
|
|
view installed systems in a list
|
List
|
|
|
|
|
|
How to create a new system definition
|
The table
below describes how to create a new system definition:
|
Note:
|
When the system definition has been created, remember to grant
access to the system to the appropriate users.
|
|
Step
|
Action
|
|
1
|
Result: The Setup
wizard starts and displays the Welcome screen.
|
|
2
|
The Select Components screen
is displayed.
|
|
3
|
The Program Options screen
is displayed.
-
Specify the number
of System Control Windows you
want to be available, normally the number of instruments that will
be simultaneously connected to the PC.
Maximum value is
1 for CU-950/CU-960
USB
4 for CU-950/CU-960 Advanced.
4 for CU-900 PCI
-
Click the Next button.
|
|
4
|
The Start Copying Files screen
is displayed.
|
|
5
|
The System installation screen
is displayed.
|
|
|
|
|
|
How to edit a system definition
|
The table below
describes how to edit the parameters of an existing system definition:
|
Step
|
Action
|
|
1
|
Select Administration:System
setup in the UNICORN Manager.
Result: The System Setup dialog box is displayed.
|
|
2
|
Select the system in the System
Setup dialog box and click the Edit button.
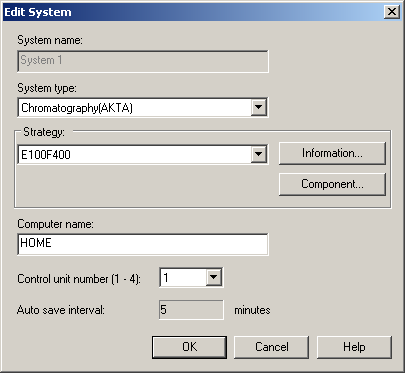
Result: The Edit System dialog box is displayed.
|
|
3
|
The fields of the dialog box are described below.
-
System name
Type the system name. Names can be up to 30 characters long.
|
Note:
|
The system name can be set only when a new connection is defined.
It cannot be edited later since user access rights are linked directly
to the system name.
|
-
System type
Select a system type, either Chromatography, Oligo or Xpress.
-
Strategy
Select a
strategy for the system from the drop-down list.
Click the Information button
to display information about the selected strategy.
The Component button
is described in step 4 below.
|
Note:
|
Available strategies are determined when UNICORN is installed
(see Software
installation). If there are several strategies
installed, make sure that the selected strategy is appropriate for
the system.
|
Step continued below.
|
|
3, cont.
|
-
Computer name
The Computer name should be the same as the Windows name of
the computer that the system is connected to. Normally this is the
local computer.
-
Control unit number
Select the control unit number (1-4). This is the connection number
for the system on the local computer.
CU-900
PCI: The control unit number is set with the DIP switch,
see How to
install CU-900 PCI.
CU-950 USB/CU-960: Must
be installed with the control unit number 1.
CU-950/CU-960 Advanced:
Please contact your local GE Healthcare representative.
-
Auto save interval
UNICORN saves a copy of the result file every five minutes during
a run. This minimizes loss of data in the event of a computer failure.
The interval cannot be changed.
-
Component...
See step 4 below.
|
|
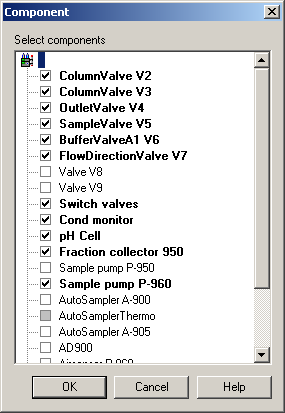
4
|
Some system strategies allow you to define the specific
system components included in the system.
-
Click the Component button to specify the
system components.
-
If the Component button
cannot be clicked, go to step 5.
Result: The Component dialog box is displayed.
|
Note:
|
The strategy contains instructions for all possible components,
but only instructions for the selected system components will be
shown.
|
Caution! If you make
changes to a system, you may also have to change the arrangement
of tubing, pumps, columns etc. on the system. An attempt to control
a system using the wrong strategy may cause malfunction and ultimately
damage the system.
|
|
5
|
Click OK and
then Close.
|
|
|
|
|
|
How to delete a system definition
|
The table below describes how to delete a system definition:
|
Note:
|
A system definition can only be deleted if the system is idle
and no users are connected to the system.
|
|
Step
|
Action
|
|
1
|
Result: The Setup
wizard starts and displays the Welcome screen.
|
|
2
|
The Select Components screen
is displayed.
|
|
3
|
The Program Options screen
is displayed.
|
|
4
|
The Start Copying Files screen
is displayed.
|
|
5
|
The System installation screen
is displayed.
-
Select the radio
button corresponding to the system you want to delete.
-
Click the Change button
to display the System Setup screen.
-
Click the Clear button
to clear all the fields.
-
Click OK to
go back to the System Installation screen.
-
Click the Next button.
-
Click the Finish button.
|
|
|
|
|
|
How to delete a strategy
|
The table below describes how to delete a strategy.
|
Note:
|
You can only delete strategies that are not currently in use.
|
|
Step
|
Action
|
|
1
|
Select Administration:System
setup in the UNICORN Manager.
Result: The System Setup dialog box is displayed.
|
|
2
|
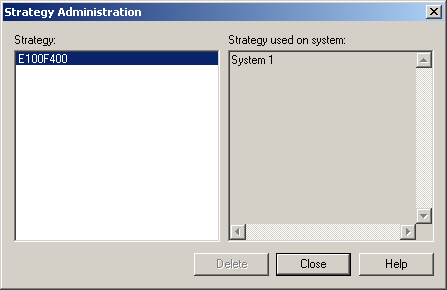
Click the Strategy button.
Result: The Strategy Administration dialog
box is displayed.
|
|
3
|
Select a strategy and click the Delete button.
|
|
|
|
|
|
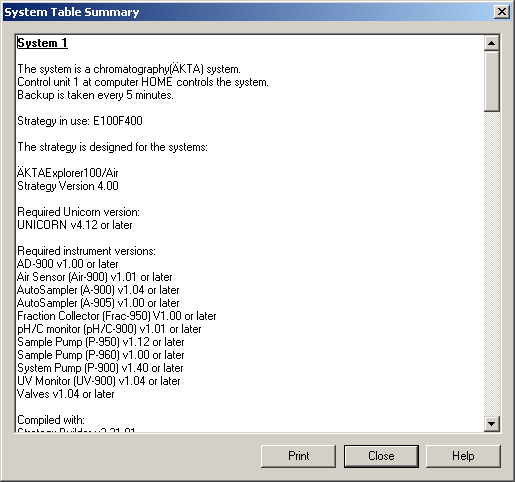
How to view or print a system summary
|
You can view and print a total summary of a selected system
from the System Table Summary dialog
box.
The table below describes how to view and print an information
summary of a selected system:
|
Step
|
Action
|
|
1
|
Choose Administration:System
Setup in the UNICORN Manager.
Result: The System Setup dialog box is displayed.
|
|
2
|
Result: System Table Summary dialog box
is displayed:
|
|
3
|
|
|
|
|
|
2005-06-15
|
|
|